
Picture this: you're stepping off a curb on your way to grab coffee, your foot rolls outward, and a sharp jolt of pain shoots up your leg. You freeze, grab the nearest wall, and wonder — did I just break something? If this sounds familiar, you're in the right place. Understanding ankle sprain causes, symptoms, and treatment is the difference between a two-week recovery and months of lingering instability. Ankle sprains are the most common musculoskeletal injury in the world, and they don't discriminate — athletes, office workers, and weekend warriors all deal with them. For ongoing foot and ankle care beyond this guide, explore our foot care resource section.
Your ankle joint is stabilized by ligaments — dense, fibrous bands that connect bone to bone. When your foot twists or rolls beyond its normal range of motion, those ligaments stretch or partially tear. That's a sprain. The lateral ligaments on the outer ankle are most commonly involved, which is why inversion sprains (the foot rolling inward) account for the vast majority of ankle injuries according to published literature on ankle sprains. The severity can range from a minor stretch that resolves in days to a complete ligament rupture requiring months of rehabilitation.
This guide covers everything you need to know: what causes ankle sprains and who's at risk, how to identify the symptoms, exactly how to treat the injury, and how to stop it from happening again.
Contents
Ankle sprains don't only happen during big dramatic sports moments. Most happen during completely mundane situations — which is part of why they catch people off guard. Knowing the typical scenarios puts you in a better position to prevent them.
The most common causes of ankle sprains are frustratingly ordinary:
One critically underappreciated factor: a previous ankle sprain. Once you've sprained an ankle, the proprioceptive nerve fibers in the ligaments — the sensors that tell your brain where your foot is in space — take a long time to fully recover. Without targeted rehab, they never fully return to pre-injury sensitivity. That's why the same ankle keeps getting re-sprained. It's not bad luck. It's incomplete healing.
Certain activities dramatically elevate your risk. The highest-risk sports include:
Beyond the sport itself, certain physical traits increase vulnerability:
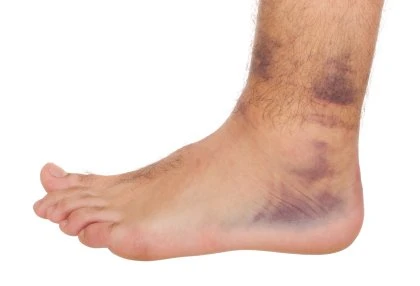
Understanding the injury mechanism helps you accurately assess your own situation. The same outward symptom — swelling and pain around the ankle — can mean very different things depending on what's actually damaged inside.
When your ankle rolls inward (the most common direction), the lateral ligament complex takes the hit. It consists of three ligaments: the anterior talofibular ligament (ATFL), the calcaneofibular ligament (CFL), and the posterior talofibular ligament (PTFL). The ATFL is almost always injured first — it's the weakest of the three and positioned to take the most stress during inversion.
When the ligament fibers stretch beyond their elastic limit, small tears occur. Your body responds immediately with inflammation — blood vessels dilate, fluid rushes in, and white blood cells flood the area to begin repairs. That's why swelling and heat appear so quickly. The inflammation response is protective and necessary, but excess swelling compresses surrounding nerves and tissue, increasing pain and stiffening the joint.
Your symptoms are a direct read-out of how much damage occurred:
Notably, very severe sprains (Grade 3 — complete tears) sometimes cause less pain initially than moderate ones. This happens because the nerves in the ligament are also disrupted when the tissue is fully torn. Don't interpret mild pain as reassurance that things are fine if swelling and instability are significant.
Warning: If your pain is concentrated directly over the bony prominences of the ankle rather than the soft tissue around them, get an X-ray. A fracture and a severe sprain can feel nearly identical right after injury — and bone tenderness is the clinical indicator used to distinguish them.
If you're experiencing heel pain alongside your ankle issue, it's worth reading about heel pain and plantar fasciitis — these conditions frequently co-occur or develop as compensatory pain when you alter your gait to protect a sprained ankle.
The first 72 hours are your most important window. What you do — and don't do — in this period determines how quickly inflammation resolves and how well the ligament heals. Here's exactly what to do.
RICE (Rest, Ice, Compression, Elevation) remains the clinical gold standard for acute soft tissue injuries. Execute each component correctly:
Over-the-counter NSAIDs — ibuprofen (Advil) or naproxen (Aleve) — reduce both pain and inflammation. Take them with food, and follow standard dosing guidelines. Acetaminophen manages pain without affecting inflammation if your stomach is sensitive to NSAIDs.
Once the acute phase passes and you're starting to bear weight again, an ankle brace becomes your most important recovery tool. A quality brace stabilizes the joint mechanically, reduces the risk of re-rolling, and gives you the proprioceptive feedback the injured ligaments can no longer fully provide.
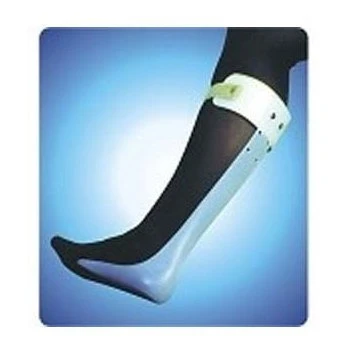
Two types of ankle supports are consistently recommended for sprain recovery:
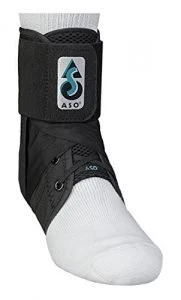
Wear your brace during all weight-bearing activity throughout the recovery period — walking, errands, workouts. You don't need it while sleeping or resting with the ankle elevated. Continue wearing it during sport even after pain fully resolves, until you've completed a full strengthening program.
Medical professionals classify ankle sprains into three grades based on the extent of ligament damage. This grading system directly informs treatment decisions and recovery expectations — knowing your grade matters.
| Grade | Ligament Damage | Typical Symptoms | Weight Bearing | Treatment Focus |
|---|---|---|---|---|
| Grade 1 — Mild | Microscopic fiber tears; ligament stretched but structurally intact | Mild tenderness, minor swelling, little to no bruising | Painful but possible; light limping | RICE, compression, early gentle motion |
| Grade 2 — Moderate | Partial tear of the ligament | Moderate to severe pain, noticeable swelling, bruising, some joint instability | Difficult and painful; crutches often helpful | RICE, bracing, physical therapy, progressive loading |
| Grade 3 — Severe | Complete ligament rupture | Severe swelling and bruising, marked instability, sometimes paradoxically less acute pain | Usually not possible; significant pain with any load | Immobilization, medical evaluation, structured rehabilitation program |
Here's what realistic recovery looks like for each grade:
A common mistake is using "pain-free" as the marker for being healed. Pain resolves weeks before the ligament has regained its full mechanical strength. Returning to activity before strength and proprioception are rebuilt is what causes repeat sprains.
One of the most practical decisions you face after spraining your ankle is figuring out whether you need professional evaluation or whether home treatment is appropriate. Getting this call right saves you from unnecessary ER trips — and from under-treating a serious injury.
See a doctor if any of these apply:
Children and older adults should have a lower threshold for evaluation. Growth plate injuries in children can mimic sprains closely but require different management. Older adults have higher fracture risk from the same mechanism that causes a sprain in younger people.
Home treatment is appropriate if you meet these criteria:
If you're faithfully following RICE and not seeing improvement after 5–7 days, book an appointment regardless. Some injuries need imaging or physical therapy to diagnose properly and treat effectively.
If your sprain happened weeks ago and your ankle is still swollen, tender, or giving out on you, something in the recovery process has broken down. This is common, and it's almost always correctable — but you need to identify the specific gap.
These are the most frequent reasons ankle sprains drag on longer than they should:
Start these exercises once acute pain and major swelling are under control — typically 3–5 days for mild sprains, 1–2 weeks for moderate ones:
For a broader framework for protecting your lower extremities long-term, our guide to keeping your feet healthy covers common problems, prevention strategies, and the habits that keep your feet and ankles functioning at their best.
Recovery time depends entirely on the grade. Grade 1 sprains typically resolve in 1–3 weeks with proper care. Grade 2 sprains take 3–6 weeks, with continued bracing during activity for longer. Grade 3 sprains — complete ligament ruptures — take 3–6 months, often with structured physical therapy. The single most common mistake is assuming that when the pain stops, healing is complete. Ligament remodeling continues for weeks after symptoms disappear, and returning to full activity too soon is what leads to chronic instability.
Wrap it — especially in the first 48–72 hours. Compression with an elastic bandage limits swelling and provides mild structural support. Start from the toes and wrap upward in overlapping figure-eight loops. Don't wrap so tightly that your toes turn blue or numb. For daily activity, a proper ankle brace provides more consistent support than a bandage alone and is strongly preferred once you're moving around regularly.
For Grade 1 sprains, walking with some discomfort is generally fine and can actually support recovery by promoting circulation. For Grade 2 sprains, limit walking in the first 24–48 hours and use crutches if walking causes significant pain. For Grade 3 sprains, avoid weight-bearing until you've been evaluated by a medical professional. Forcing weight on a severely damaged ligament can worsen the tear and complicate recovery.
Fractures and sprains can feel nearly identical immediately after injury — both cause pain, swelling, and difficulty walking. The key clinical distinction is bony tenderness: if pressing directly on the bony malleolus (the prominent bump on either side of your ankle) causes sharp, localized pain, that's a fracture warning sign requiring an X-ray. With a sprain, the most tender area is the soft tissue just below and in front of those bony landmarks. If you can't bear weight at all within 24 hours of injury, get evaluated.
Ice is the right choice in the first 48–72 hours. It reduces swelling, constricts blood vessels, and numbs acute pain. After the acute phase, heat becomes appropriate — it improves blood flow, loosens stiffness, and promotes tissue flexibility. Many people benefit from alternating heat and ice (contrast therapy) during the subacute phase, roughly days 3–7. Never apply ice or heat directly to bare skin, and limit sessions to 15–20 minutes at a time.
Yes — with complete rehabilitation, your ankle can fully return to pre-injury strength and stability. The critical factor is completing the proprioception and strengthening work, not just waiting for pain to go away. Without targeted rehab, the ankle often remains subtly weaker and less coordinated, which is exactly why so many people experience repeated sprains on the same side. Commit to the full rehabilitation program, and your ankle can come back stronger than it was before.


About Mehnaz
Mehnaz is the founder and editor of RipPain, a health resource site dedicated to helping readers navigate pain management, recovery, and medical device research. Her work on the site is driven by personal experience caring for seriously ill family members, which led her to study evidence-based guidance from physicians, pain specialists, and published medical research. She curates and summarizes expert medical insights to make credible health information accessible to everyday readers.
You can get FREE Gifts. Or latest Free phones here.
Disable Ad block to reveal all the info. Once done, hit a button below