
Your feet shed dead skin at a faster rate than almost any other part of your body — roughly 30,000 to 40,000 skin cells per hour across the entire body, with the soles taking the brunt of friction, pressure, and sweat. That buildup compounds quickly. Learning how to exfoliate feet at home is one of the most practical things you can add to your foot care routine — no expensive spa visits, no specialized training required. For more strategies on keeping your feet comfortable and healthy, explore our foot care section.

Exfoliation removes the outermost layer of dead, hardened skin cells, smoothing texture, reducing odor, and allowing moisturizers to actually penetrate instead of sitting on the surface. Done correctly, the whole process takes around twenty minutes and costs close to nothing. The challenge is understanding which method fits your skin type, how often to do it, and what habits to avoid so you do not make things worse.
This guide walks you through the science behind dead skin buildup, a clear step-by-step routine you can follow at home, a comparison of methods by cost and effort, common myths, and the mistakes most people make without realizing it. Whether you are dealing with cracked heels, stubborn calluses, or just routine dryness, you will find something here that works for your situation.
Contents
Your skin constantly renews itself through a process called desquamation — dead cells migrate to the surface and shed naturally. On most of your body, this cycle runs without any visible sign. On the soles of your feet, it is a different story. Plantar skin is two to three times thicker than the skin on your arms or legs, and it faces constant mechanical pressure with every step you take. That combination slows natural shedding dramatically, causing dead cells to accumulate rather than flake away. The result is the rough, dry, sometimes thickened texture that most people associate with neglected feet.
Unlike most skin, the soles have no sebaceous (oil-producing) glands. That means the plantar surface cannot moisturize itself the way other skin does. Dead cells bond more tightly to the surface rather than shedding cleanly. According to research on skin exfoliation, the outermost layer of skin — the stratum corneum — plays a protective role, but excess thickness beyond the functional range creates problems, not added protection. Exfoliating regularly disrupts that accumulation cycle before it compounds into calluses and cracks.
Thick, uneven calluses do more than look rough. They alter the way pressure distributes across your foot as you walk. When calluses form unevenly — heavier on the outer heel, for example — they create friction points that can lead to blisters, skin tears, and over time, subtle changes in your gait. If you have already been dealing with heel pain, thickened skin on the plantar surface can amplify the strain on the tissues underneath. It is worth reading more about heel pain and plantar fasciitis if that pattern sounds familiar to you.
Circulation plays a role as well. When blood flow to the feet is reduced, skin cells receive less oxygen and fewer nutrients, making them more prone to chronic dryness and slower healing. Keeping feet exfoliated and moisturized supports the skin's repair processes — especially if circulation is already a concern. For practical steps on addressing that, our guide on what to do about poor circulation is a useful place to start.
Pro tip: If you notice deep heel cracks, bleeding fissures, or any signs of infection around your feet, pause manual exfoliation and consult a podiatrist before continuing — broken skin is not a starting point for abrasive tools.
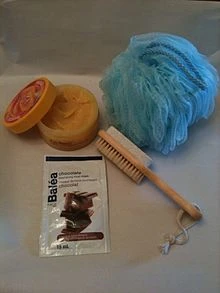
You do not need a full product haul to get effective results. Most people already have the basics. Here is what to gather before you start:
If you want to upgrade the experience, an electric callus remover handles thick buildup with less effort, and a dedicated foot soak machine softens skin more evenly before you begin. Our roundup of the best ionic detox foot baths covers several options worth considering if that interests you.
Follow these steps for a basic at-home routine that delivers consistent results without damaging the skin barrier:

Important: Keep your soak to 15–20 minutes maximum. Longer soaks over-soften the skin, which increases the risk of micro-tears during exfoliation and can leave your feet sore rather than smooth.
This is one of the most common misconceptions in foot care. A coarser pumice stone or metal grater-style file feels like it is doing more — but in practice, aggressive exfoliation triggers your skin to respond by producing calluses faster as a protective mechanism. You end up in a cycle of over-removal and rapid regrowth, with feet that feel rough again within days. A medium-grit tool used consistently and gently outperforms harsh tools used occasionally, every time.
Normal skin — even skin that does not feel dry — still develops dead cell buildup on the soles. Callus formation is driven primarily by friction and pressure, not hydration level. If you are on your feet for long hours, exercise regularly, or wear shoes that create friction, your soles are building calluses regardless of how moisturized your skin feels. Exfoliating is part of standard foot maintenance for nearly everyone.
A few other myths worth clearing up:
The most effective at-home methods are also the least expensive. A pumice stone — the oldest and most widely used foot exfoliation tool — costs between $3 and $10 and lasts several months with basic maintenance. A DIY scrub made from coarse sugar or sea salt mixed with a tablespoon of olive oil costs practically nothing and works well for mild to moderate buildup. These low-cost options handle the vast majority of everyday exfoliation needs without any additional investment.
For thicker calluses or when physical exfoliation feels like too much effort, there are more involved options. Electric callus removers have become popular because they require less manual pressure and cover more surface area quickly. Chemical foot peel masks offer significant results for stubborn buildup but take longer — most require a 60–90 minute application period, followed by a week of progressive peeling. Here is how the options compare side by side:
| Method | Typical Cost | Effort Level | Best For | Recommended Frequency |
|---|---|---|---|---|
| Pumice stone | $3–$10 | Low–Medium | Mild to moderate buildup | 1–2× per week |
| Foot file / rasp | $5–$20 | Medium | Heel calluses | 1–2× per week |
| DIY sugar or salt scrub | $0–$3 | Low | General maintenance | 2× per week |
| Store-bought foot scrub | $8–$25 | Low | Sensitive or easily irritated skin | 1–2× per week |
| Electric callus remover | $20–$60 | Very low | Thick or stubborn calluses | 1× per week |
| Chemical foot peel mask | $10–$30 per use | Low (passive) | Severe or widespread buildup | Once every 4–6 weeks |
| Professional pedicure | $30–$80+ | None | All types, shaping included | Monthly |
For most people, a $5–$10 pumice stone or foot file paired with a consistent moisturizing habit delivers excellent value. More expensive options make sense when callus buildup is severe, when physical exfoliation is difficult due to limited flexibility, or when you want faster or more dramatic initial results.
This is the most common mistake by far. When you exfoliate too frequently or press too hard, you remove not just dead cells but also living cells that form the foot's protective barrier. The skin responds by accelerating callus production — a built-in defense against perceived damage. The result is feet that feel rougher after a week than before you started. Stick to once or twice per week and use the lightest touch that still gets results. If your feet feel raw or sensitive after exfoliating, you are using too much pressure or going too often.
Exfoliation opens up the skin surface and removes the dead layer that was partially sealing in moisture. Freshly exfoliated skin absorbs what you apply next far more efficiently than untreated skin — which means skipping moisturizer is a significant missed opportunity. Apply a rich cream immediately after exfoliating while the skin is still warm. Urea-based formulas (10–25% concentration) work particularly well on thickened plantar skin because urea is a natural humectant that also helps break down dead cells between sessions.
Other mistakes worth avoiding:
Physical exfoliation uses a tool or abrasive material to manually remove dead skin. Chemical exfoliation uses acids — typically alpha-hydroxy acids like glycolic or lactic acid, or beta-hydroxy acids like salicylic acid — to dissolve the bonds between dead cells so they shed on their own. Both approaches are valid. The right choice depends on your skin's condition, your tolerance for effort, and how quickly you want results.
Physical exfoliation gives you immediate, visible results and lets you target specific areas precisely. Chemical exfoliation requires patience — the peeling process takes several days to complete — but it reaches deeper into thick callus layers without requiring any friction.
A trained pedicure technician can often achieve cleaner results than most at-home routines, especially for severe callus buildup or when precision shaping is needed. However, professional treatments come with higher ongoing costs and depend on salon hygiene practices that vary considerably from place to place. DIY exfoliation gives you full control over tool cleanliness, product selection, and technique — and with a consistent weekly habit, most people achieve results comparable to a standard salon pedicure. The choice comes down to time, budget, and the severity of your starting point.
Once or twice per week is the standard recommendation for most people. If your skin is sensitive or you are new to foot exfoliation, start with once a week and increase only if needed. More frequent exfoliation typically causes more problems than it solves.
A simple mix of coarse sea salt or sugar, a tablespoon of olive or coconut oil, and a few drops of tea tree or peppermint essential oil works well for most people. The salt or sugar provides the abrasion, the oil moisturizes as you scrub, and the essential oil adds mild antimicrobial properties.
You should approach it with extra caution. Diabetic neuropathy reduces sensation in the feet, making it easy to apply too much pressure or cause skin damage without realizing it. A podiatrist can assess your specific situation and recommend safe methods tailored to your needs.
With physical exfoliation, you will notice smoother skin immediately after your first session. For significant callus reduction, consistent weekly sessions over two to four weeks typically produce the most noticeable change. Chemical foot peels show full results after the peeling process completes, usually seven to ten days after application.
A washcloth alone is generally too mild to make a meaningful difference on foot skin. It works well as a gentle option for children or people with very sensitive skin, but for adults with normal callus buildup, a pumice stone or foot file is significantly more effective.
Exfoliating your feet at home is a straightforward habit that delivers real, lasting results — and it costs almost nothing to start. Pick up a pumice stone, soak your feet for fifteen minutes, follow it immediately with a good moisturizer, and repeat once or twice a week. That simple routine is enough to keep most foot skin in good shape. When you are ready to go further, explore our foot care section for more practical guides on keeping your feet healthy, reducing pain, and building habits that hold up over time.


About Mehnaz
Mehnaz is the founder and editor of RipPain, a health resource site dedicated to helping readers navigate pain management, recovery, and medical device research. Her work on the site is driven by personal experience caring for seriously ill family members, which led her to study evidence-based guidance from physicians, pain specialists, and published medical research. She curates and summarizes expert medical insights to make credible health information accessible to everyday readers.
You can get FREE Gifts. Or latest Free phones here.
Disable Ad block to reveal all the info. Once done, hit a button below